Let’s quickly understand what Nav2 is and why we need it.
And before we get started, let’s just be clear on the terms we are going to use. When I write about Navigation, Navigation 2, Nav2, well this is all the same, I am writing about the Navigation 2 stack in ROS2 (also if I write ROS I also mean ROS2).
So, why do we need Nav2 in the first place? Well, as you probably already know, ROS is a great framework that allows you to develop new robotics applications in no time. You get a lot of “plumbing” already done for you, a huge set of plug & play libraries, a community to help you, etc.
Now, how do you go from knowing the ROS basics, to successfully implementing navigation for a mobile robot? This is not trivial at all, and fortunately, the Navigation 2 stack was developed just for that. The “stack” is a collection of packages that have been developed with one goal in mind.
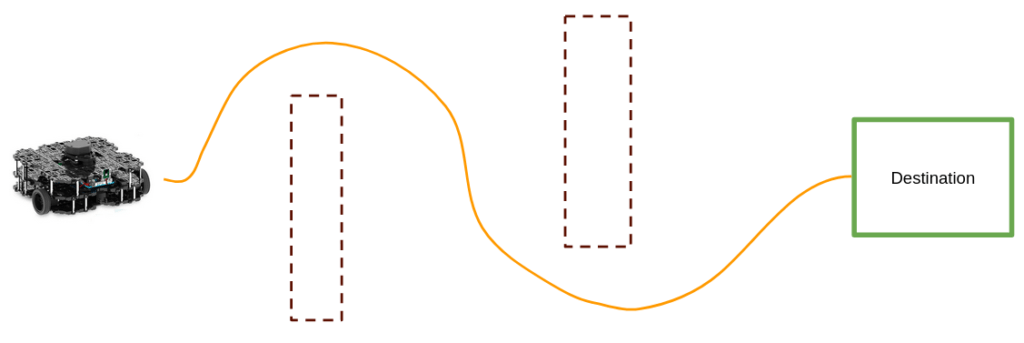
And what is this goal? The main goal is to make a robot move from point A to point B, in a safe way. So, basically, to find a path that allows the robot to reach the destination, while making sure that it will not collide with other robots, with people, and obstacles.
To achieve this, we will do a 2 step process:
- We will create a map of the environment using SLAM.
- We will make the robot navigate using this map – with the Navigation functionalities and tools.
Install Nav2
As a prerequisite for this tutorial, make sure you have installed Ubuntu and ROS2 on your computer. I strongly recommend using a dual boot for Ubuntu, not a virtual machine (3D tools like Gazebo are usually not working well on VMs). If you do want to use a VM, choose VMWare Workstation (free version) over VirtualBox.
For the following, I will use Ubuntu 22.04 and ROS2 Humble.
So, once you have correctly installed and setup ROS2 on your computer, let’s install the Navigation 2 stack.
Here is how to install the Nav2 packages.
As we will use a simulation of a robot on Gazebo, let’s install the packages for this robot (Turtlebot3).
And that’s it to get started!
Make the robot move in the environment
Before we generate a map with Nav2 and use it for navigation, we need to make sure that we can make our robot move in the environment.
If you were using a custom robot, you would need to adapt it first for Nav2. This process is really not easy, especially if you’re doing it for the first time. So, to make things easier – as the goal here is just to get an introduction of the stack – we will use the Turtlebot3 in Gazebo.
We first need to export an environment variable to choose which version of the Turtlebot3 we want to use (burger, waffle, waffle_pi).
Add this line at the end of your .bashrc:
. After doing that, make sure to source the .bashrc, or to open a new terminal.
Then, time to start the simulated robot in a Gazebo world.
Note: the first time you launch this world, it may take some time (a few minutes) and you’ll have the impression that it froze on the loading screen. Don’t worry, just wait, don’t touch anything, and let it load the map. Then, when you start again, it will be much faster.

Great, now we have a robot inside a room. Let’s make it move. In a new terminal, start the teleop node.
You will see some instructions on the terminal. Press keys W, A, S, D, to make the robot move. It’s not necessarily super intuitive the first time you use it, so take a few minutes to familiarize yourself with the commands. And make sure your mouse is focused on the terminal when you press a key.
Once you can make the robot move in the world, you are ready for the next steps.
Generate a map with ROS2 Nav2 – using SLAM
In order to make the robot navigate autonomously in the world, we first need to generate a map of that world. And to do that, we’ll use the SLAM functionality of the ROS2 Nav2 stack.
Note: there are many possible tools and algorithms to do SLAM. To make it easier we’ll choose the default SLAM tool for Turtlebot3: cartographer. Later on you can choose to use other tools, such as slam_toolbox.
So, how to generate a map with SLAM?
Start the SLAM functionality and RViz
First make sure you have started the robot – here, Turtlebot3 in Gazebo.
Then, let’s start the SLAM functionality for Turtlebot3.
Note: I provide the “use_sim_time” argument because we are running on Gazebo, so we want to use the Gazebo time. If using a real robot, skip this argument.
After running this command you will see RViz starting.

You can see the TFs of the robot, as well as the LaserScan from the Lidar sensor (red dots). Some pixels are already grey/black. As you make the robot move, pixels will be cleared into 3 categories:
- Free space (will turn white),
- Obstacle (will turn black),
- Unknown space (will stay grey).
Generate and save the map
Now, make the robot move in the world. Here we start the Turtlebot3 teleop node.
Make the robot move around until you get a satisfying result. By the way, what is a satisfying result? Well if you can manage to clear most of the free space (white pixels), and get most of the obstacles (black pixels), that’s good enough, and navigation will work fine. No need to clear 100% of the pixels.

Once you get a good enough result, it’s time to save the map. Make sure you don’t stop the navigation terminal before you save the map, otherwise you’ll have to start everything again.
To save the map, open a new terminal and run this command.
With the optional “-f” argument you can specify the path/name for the map. Don’t add any extension, this will be done automatically for you.
Once you run this, you should see some logs in white and maybe yellow. If it doesn’t work (red error logs), try again several times.
Your map has now been generated, and you can stop all the commands in all the terminals.
What’s in the map?
You should now have 2 new files:
- my_map.yaml
- my_map.pgm
The PGM file is the image representing the map, with white (free space), black (obstacles) and grey pixels (unknown space).

The YAML file contains important info about the map. This will be used by the Navigation stack.
Here is more info about the most important fields:
- image: the relative path from the YAML file to the PGM file.
- resolution: in meters per pixels. So, here 0.05 meters per pixels. One pixel represents 5 cm. That gives you the precision of the map.
- origin: the coordinates of the robot (when it started) relative to the lowest left point on the map.
- negate: if you set it to 1, then free and occupied space will be inverted.
- occupied_tresh and free_tresh: very basically put, when mapping, each pixel will be given a probability about whether there is an obstacle or not. With the values that you see here, if the probability is greater than 65%, we consider the space to be occupied. If the probability is less than 25%, the space is free.
Quick fix and DDS issue with Nav2
Before we continue with Navigation, we need to fix 2 small things.
First, as you may know, ROS2 communication is based on DDS (for the middleware). No need to dive into this now, you just have to know that there are several possible DDS implementations, and the default one for ROS2 is Fast DDS. Unfortunately it doesn’t work so well with Nav2, so it’s been recommended to use Cyclone DDS instead.
Let’s install and setup Cyclone DDS for ROS2.
Cyclone DDS is now installed, now you need to tell ROS2 to use it instead of the default one.
Add this line into your .bahsrc:
. You can put it just before sourcing ROS2 for example.
Great, DDS problem solved!
One more thing to do, and this is a Turtlebot3 specific issue.
Open this param file:
Find this line, and replace it like you see below.
Make the robot navigate using the map and ROS2 Nav2
Great, you now have a map, and everything setup so you can make the robot navigate autonomously, while avoiding obstacles.
Start Navigation 2 for the robot
Let’s start from a clean environment – stop everything, close and reopen all terminals. There are a lot of things that can go wrong with RViz and Gazebo, so we make sure to reduce the risks.
Now, start the robot again.
In another terminal, start the Navigation stack, and provide the map as an argument.
Note: use “use_sim_time” only if running with Gazebo. For the “map” argument, provide the path to the YAML file of the map.
If you don’t see the map on RViz, try finding the “map” topic options on the left panel, and set to “transient local” instead of “volatile”. You might also try to restart everything, and even reboot your computer.
Now, you should just see the map on the screen, but no robot. You’ll also see some kinds of error logs in the terminal. This is because Nav2 doesn’t know where your robot is, and you need to provide the first 2D pose estimate.

2D pose estimate and Navigation goals
Click on the “2D pose estimate” button on RViz. Then click on the map where the robot is (you should see that on Gazebo). Maintain the click to also specify the orientation with a green arrow.
Once you’re done, you should see something like that on RViz.

Finally, you can give navigation commands! Click on “Nav2 Goal”, then click on the map to select a position + orientation, and the robot should start to go to that pose. You can verify on Gazebo, to see that the robot is actually moving.

Now, you can experiment with different poses. Give valid ones, and also invalid ones (ex: a point that cannot be reached).
Going further with ROS2 Nav2
In this tutorial you have seen how to get started with the Navigation 2 stack. You should now have a better idea of how it works and how to use it.
Now to go further and really understand how things work, you can continue your learning with the ROS2 Nav2 course (6 hours of content). In this course you’ll also:
- Understand how Nav2 works behind the hoods, with all components: global/local planner, parameters, TFs, etc.
- Learn how to build your own simulated world in Gazebo to be able to use Nav2 for your own office/classroom/building.
- Get an intro on how to adapt a custom robot for Nav2, with all the steps.
- Program with Nav2 directly using Python instead of the buttons on RViz.
- And even more tips and best practices.